
Been wanting to use eyeshadow but don't know how, or even where to start? Then read this tutorial on how to cop a basic eye makeup look. I'll show you how to create basic day and night eye makeup as well.

First, you have to get to know your eyelids. This is crucial in knowing where to put what color. I've colored the parts where we usually put eyeshadow so read on:
Color Codes:
Red- Inner lid
Gray- Lower lid
Blue- Middle lid
Pink- Crease
Green- Above crease
Black- Outer crease
Yellow- Brow bone

Now that you've gotten to know your eyelid better, let's start applying eyeshadow. Since this is just a very basic tutorial, let's just deal with the three parts on the eyelid where we commonly put eyeshadow: Lower lid, Crease, and Brow bone. I'm going to use brown colors because it's a beginner- friendly shade.
HOW TO CHOOSE YOUR EYESHADOW COLOR
1. Choose any three colors and make sure they're from the same color family, and in the following color degrees: Dark, medium, light
2. Make sure the color suits the occasion
3. For beginners, go for eyeshadows in a frosted finish. Its moderate pigmentation and buttery texture is very easy to work with.
4. Use a good eye primer before applying eyeshadow to keep your look intact, and to make the colors appear more vibrant.
Click READ MORE and see the rest of the tutorial!
DAY EYE MAKEUP

Step 1: Dab the eye shader brush on the lid wash (medium shade). Deposit color onto your lids using a gentle, dabbing motion.

Step 2: Using a blender brush, spread the lid wash up until the crease area. (where the tip of the arrows end)

Step 3: Using the blender brush, dab it onto the crease color (dark shade), tap off excess, and deposit color starting on the middle part of your crease, and dab all the way until the lowest part of your crease area. Why so? Because this prevents you from depositing too much color onto the bottom part, ergo letting you achieve a more even and natural finish. Remember to always use a very light hand when dabbing.

Step 4: Take a clean blender brush. (You may opt to use the same brush but make sure to clean it) Starting on the middle part of your crease, blur the edge of the eyeshadow and move all the way down to the lowest part of your crease. Blur the edges up until the above crease only.

This is how it should look like.

Step 5: Take the eye shader brush again, dab it on the highlighter color, (light color) and dust some onto your brow bone. Make sure you blend it evenly.

And you now have your day eye makeup look!

Your eye makeup look for daytime should only give your eyes a little emphasis. Midtone browns are great crease colors for daytime.
NIGHT EYE MAKEUP

Now's the time to give your eye makeup a bit of depth and drama. But I wouldn't require you to bring your entire makeup arsenal to work or school. In fact, you don't even have to remove the colors you've previously worn during daytime!
We'll just enhance your eye makeup for daytime. You'll only need the following: 1.) Highlighter color 2.) Darker, richer crease color.

Step 1: Take a clean blender brush, dab it on the dark and rich crease color, tap off excess, and deposit color onto the lowest part of your crease. This is a reverse of one of the techniques in the Day Eye Makeup tutorial.Why so? Because if we apply an intense color onto the middle part of the crease, we'll just end up creating a bold, sharp, and fake line.

This is how it should look like
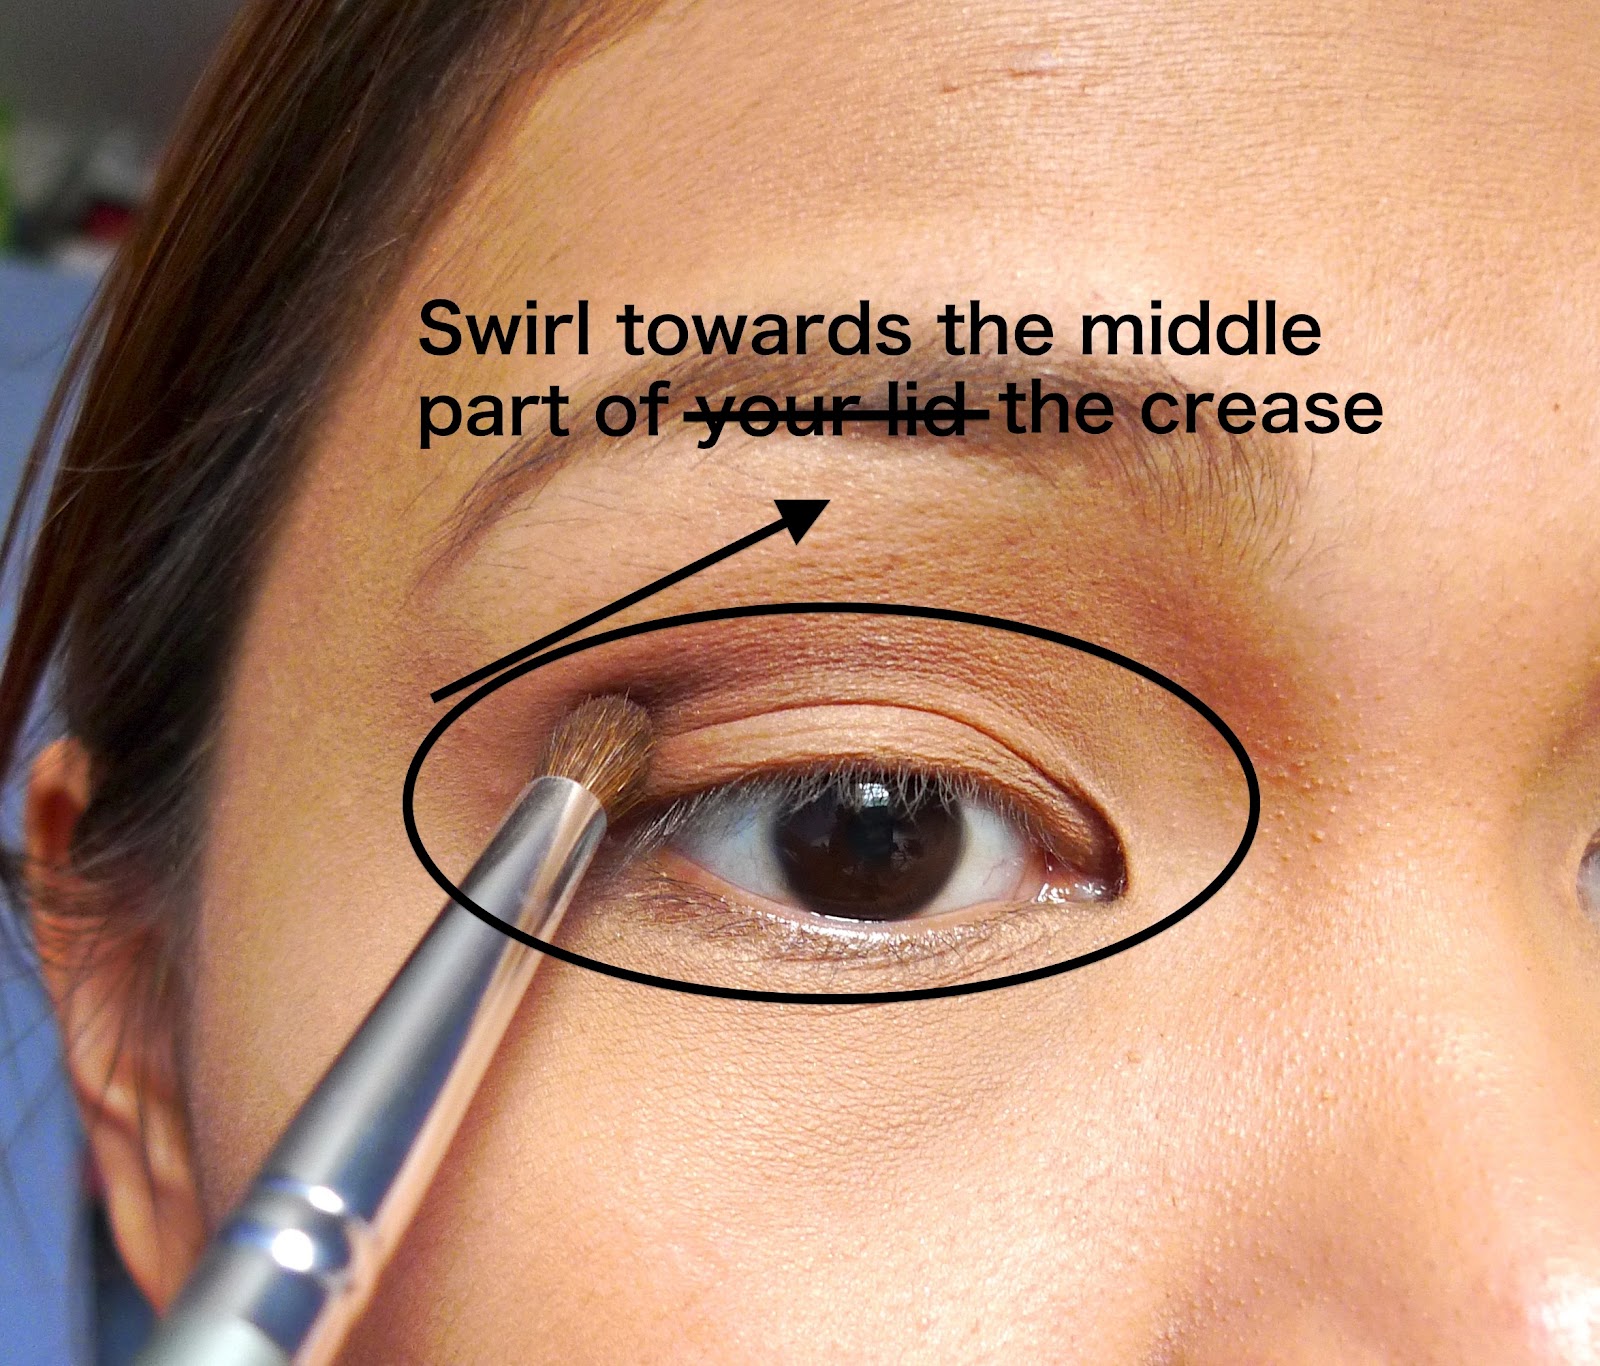
Step 2: Take a clean blender brush (or you may use again the same brush but make sure it's clean) and using a light, swirling motion, spread the color all the way to the middle part of your crease. Try your best to create a fading effect.

This is how it should look like.

Step 3: Using the same color you've used on your crease, apply some on your lower lash line starting at the edge (connect the edge of your lower lash line to the lowest part of your crease) and all the way to the middle part. Clean the brush, and swipe it gently on your lower lash line to get rid of loose powder particles.

Tadah! You're now ready for a night out to remember either with the girls or your date! :)

Chocolate browns are great for night time.

Additional tip: Don't forget to refresh the color on your lower lids. But this time, let's use the highlighter color. This will create an illusion of deeper creases. Apply some on your brow bone too.

Don't forget your mascara and eyeliner!
MORE TIPS:
1. Invest in a couple of sturdy blender brushes because they're the only eye brushes you'll ever need!
2. It also pays to invest in a good brand of eyeshadows. Why? Because eyeshadows with great quality have better pigmentation, a more workable texture and fantastic staying power, not to mention better shade selections too.
3. It's better to apply less than more at one application. You can always build the color depending on your desired intensity and look.
4. Darkened your crease color a bit too much? Remedy it by dusting some white setting powder onto it to lighten up the intensity.
When you've finally mastered these basic tips in applying eyeshadow, you can finally start mixing and matching colors, and create tons of interesting looks! Enjoy! :)
That's all folks! Let me know what you think about this. :)


18 Comments
Thanks for this tutorial, Martha :) I'm still getting the hang of applying eyeshadow. I have a different eye shape so I'm learning how to work with it :)
ReplyDeleteThanks Martha! Do you have any recs for the best blending brushes ever? :D
ReplyDeleteThanks Martha, para sakin talaga to :D Will try to practice kahit simple eotd lang. Will bookmark this post na.
ReplyDeleteThanks for this post, Martha! :) I'm not good with eye makeup so this is post is very helpful for a newbie like me. Hope I can do the same thing with my eyes. ^___^
ReplyDeleteMaggie
http://morbidfrank.blogspot.com
very helpful. I'm trying to do my own make-up now. and I really hope you can create a video on this. it would be more comprehensive for slow people like me :D
ReplyDeleteGaleng, I think this is very helpful kahit sa mga beginners Thanks! :)
ReplyDeleteVery nice and informative tutorial! thanks so much :)
ReplyDeletehttp://scarletscorpion.blogspot.com
two thumbs up with this.....ang hirap kasi mag coordinate ng mga kulay, that's why this one helps me a lot.^_^
ReplyDeletethanks martha, ive tried practicing eyeshadow but i sucks! (im noob :((
ReplyDeletety martha for this!ws
I like how you explained how to put eyeshadow with colors! Very easy to follow :) I am a new follower of your blog, and I really enjoyed walking through your site!
ReplyDeleteXOXO
www.MusingsofaMakeupMaven.com (http://sabshernandez.blogspot.com)
Hope you can visit mine too and maybe follow back? :) More power to you!
Thank you for the info :)
ReplyDeletehttp://eyahnism.blogspot.com
such a helpful post! your skin looks so healthy and those tantalizing eyes! ;)
ReplyDeleteThanks girls!
ReplyDeleteChrissy: Charm and Suesh. Suesh has a blender brushes in different sizes. :)
Kath: thanks dear! :D
Eyah: you're welcome!
Raych: Thank you! :D
Sabs: thanks dear and welcome to TBJ! :D yup, will check out your site. Thanks! :)
Jenny: welcome! :)
Alex: hello there and welcome to tbj! :D Glad you loved it! :)
Aya: You have hooded lids, no? Try askmewhats. She has lotsa tips for hooded-chinky eyes. :)
Denise: hi there and welcome to tbj! Let me know if you still have more questions. :)
Harmony: will try to do one dear! :D
Are you even wearing makeup? Looks soooooooooooooooo natural! =D
ReplyDeletei always had a hard time applying eye shadows!! duhhh. maybe i should practice more with these great tips and awesome tutorial :) thanks for this post.
ReplyDeleteOops, I realized I really don't know how to put an eyeshadow... Thanks for this, somehow I was inspired and it gave me an idea. Maybe some other time I would retry again.
ReplyDeleteI'm really having a hard time in applying eyeshadow! Thanks for this one. xoxo
ReplyDeleteThis is sooooo helpful! :)
ReplyDeleteWill try these easy steps and hopefully I can do it right!
Let me know what you think of this post! :)