
Happy Friday everyone! :) It's a sunny day! (at least in my place) Imma go out today and take advantage of the warm weather. :D
But before I go, I'll answer our fan mail for today. This is another one from Sincere, one of my lovely avid readers. She asks:
Dear Ms. Martha,
How do you apply false eyelashes? I would like to request for steps on how to use false eyelashes properly. Let's see if I'll look like Barbie. Lol!
Sincere

Hi there Sincere!
Great question! Here's a step-by-step tutorial on how to put false eyelashes on--like a PRO! I've friends who are doing professional makeup work and this tutorial is more of like a sum of all their techniques. They have a lot of varying techniques, but I've handpicked a few that really works for me. I hope you'll like it, and I hope it will work for you and everybody as well!
So click READ MORE and let's start looking like Barbie, shall we? :)

For this tutorial, I am going to use a set of natural- looking false eyelashes. These are just meant to enhance what's already there. There are different types of false eyelashes, ranging from natural, to colorful, to dramatic, and to avant garde. Choose whatever you like, but remember to choose something that will fit an occasion. Currently, false eyelashes come in synthetic and natural hair fibers. I would recommend the latter because it looks more natural on the eyes. It's a wee bit expensive than synthetic ones, but it's lightweight, tolerable, and are less likely to poke your eyes so it's absolutely worth it!

STEP 1: Apply a thin stroke of black eyeliner. The black line will serve as a filler for the gaps in between the natural and false eyelashes. When your false eyelashes are already in place, you'll have a hard time filling the gaps in between so apply eyeliner first.

STEP 2: Apply mascara. I don't really like applying mascara on my false eyelashes because it makes them look clumpy and fake. You'll only need the mascara to darken your natural lashes, not the falsies. And if you want to keep your falsies in their pristine condition, don't apply mascara on it..

STEP 3: Using a tweezer, pull out the falsies gently from the case.

STEP 4: When you've pulled out your falsies from the case, hold both ends and gently fold it, as if you're creating a U shape out of it to help retain its curved shape.
STEP 5: Measure the length of your falsies by putting it on top of your lids. Check if you're okay with the length. Point of measurement is the length of your upper lash line.

STEP 6 (OPTIONAL): If you find it too long, trim one end, then place it on your lids to check again if the length is okay. Continue doing so until you've reached the right length. Don't snip a lot right away, or you'll end up with very short falsies! Snip it strand by strand until you've reached your desired length.

STEP 7 (OPTIONAL): This is a PRO tip. If you want your falsies to look very natural, trim the inner ends so as to mimic the natural length of your genuine lashes on the inner corners of your eyes. When you think about it, your natural lashes on your inner eye corners are shorter and thinner, so trimming the inner part of the falsies just makes a whole lotta sense.

STEP 8: Apply a thin strip of glue on the base of the falsies. Gently run a finger on the edge to get rid of excess glue.

STEP 9: Blow gently on the glue to let it dry up for a bit. When the glue's consistency becomes tacky, it's time for you to put it on.
We're almost there! :D

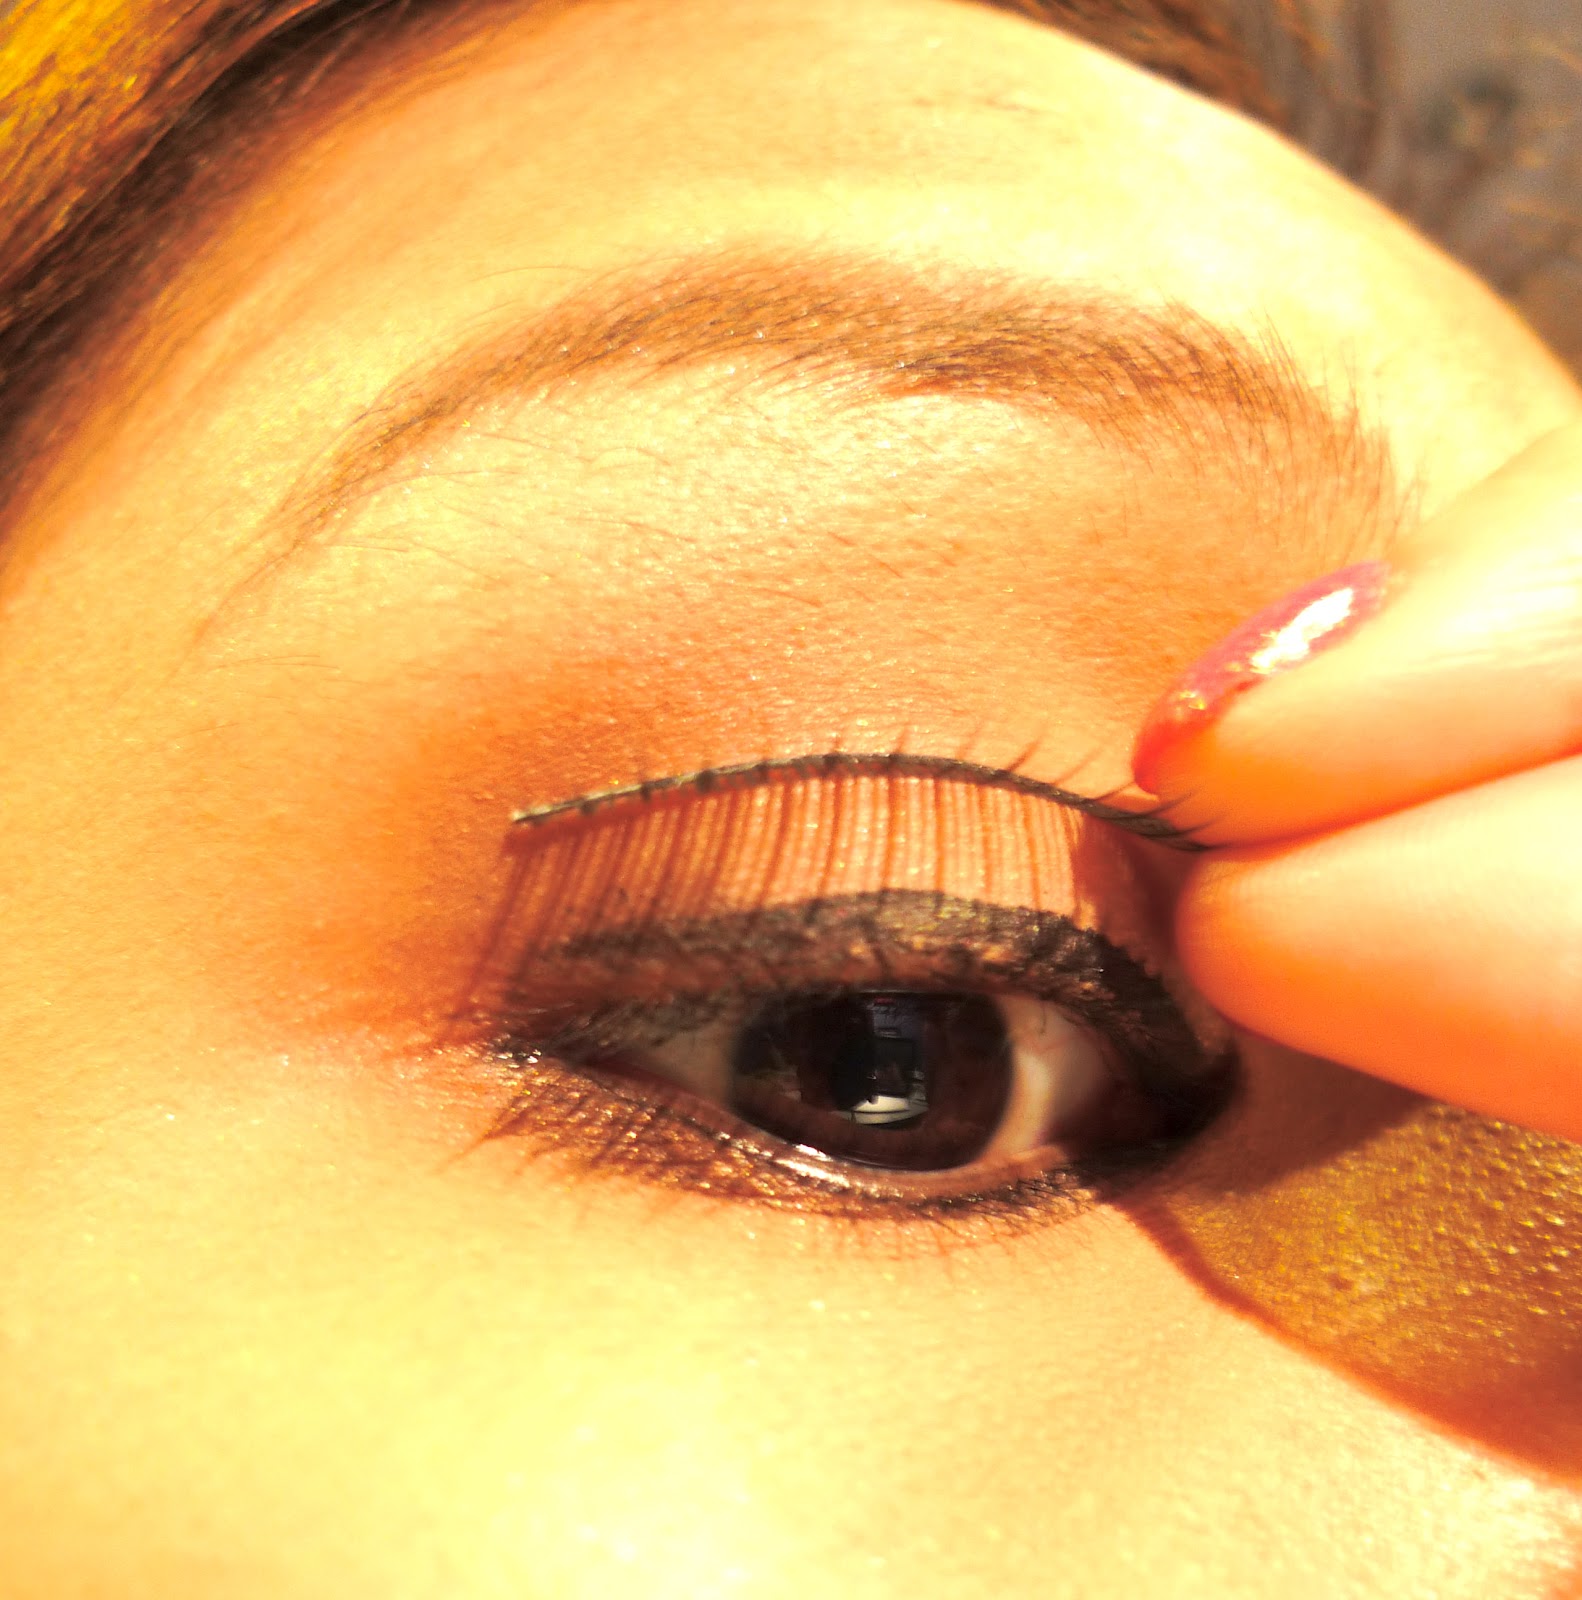
STEP 10: Start applying from the outside going in so the tip of the falsies won't end up right inside your tearducts. (It can poke your eyes!) And please use two hands. I'm only using one here because my other hand is taking the pictures. FYI, this is just a one-woman tutorial! :D

STEP 11: Press the ends firmly but gently.

STEP 12: Press the middle part gently but firmly.

STEP 13: When the falsies is finally in place, create a border on top of it using liquid eyeliner. This will also darken any white smudges from the glue.

STEP 14: Check if your falsies are already intact by gently flipping a finger on the strands. If it is, then curl gently.

There you go! Congratulations! You now know how to apply falsies like a PRO! And can you even tell that I'm wearing falsies here? :)
FINAL CHECKLIST:
1. Check if there are loose ends, and blink your eyes for a few seconds to check if the falsies are intact. If there are any loose ends: Cut the head of a Q tip, put a very small amount of glue on the sharp tip, and apply it on the loose end. Be extra careful when doing this because the tip is sharp!
2. Close your eyes or squint to check if the ends are poking your eyes. If they are, then you've applied it incorrectly. Rinse and repeat. Remove the falsies and start at Step 8. I always prefer comfort over anything else so if your falsies are hurting your eyes, better not wear them at all.
3. This method takes time, so make sure you allot an ample amount of time in order to do this correctly!

You will know if you've applied false eyelashes correctly if you feel that it's resting comfortably on your eyes, it doesn't poke, and it's blending with your natural lashes. It took me time to do this effortlessly so it goes without saying that practice makes perfect. :)
**Got a burning question about makeups, skin care products, beauty, dieting, and health tips, relationships, and whatever? Just send them to martha.stabarbara@yahoo.com or shoot 'em up at The Beauty Junkee's FB Fan Page via the MESSAGE button and I'll get back to you as soon as possible. (Please, do not send me Math- related queries. :D)


15 Comments
Great review. :)
ReplyDeletewww.gelliezelle.blogspot.com
Awesome review. Very detailed. :)
ReplyDeletewww.gelliezelle.blogspot.com
Thanks for the tips! :)
ReplyDeleteGaleng! I didn't know that I can curl the falsies pala hehe I'll try that nga.
ReplyDeleteI soo need this. Pero takot talaga ako maglagay ng falsies on my own baka lalo mawala lashes ko. Thanks for the step by step guide :)
ReplyDeleteCutting the inner part makes a lot of sense! Thanks!
ReplyDeleteHi Martha! Sorry for the out of the topic post but I've been noticing your bed sheets, the pink leopard print, they're bed sheet right? Where do get them? :)
ReplyDeletewow love it! thanks Ms. Martha!
ReplyDeletelovelove...
omg martha what otheraffordable eyelash glue would you recommend, because you use the glue in the eyelashes kit.
ReplyDeletety for this i will definitely try this soon!
nice! very detailed :) I love those missha lashes! they look so natural ;)
ReplyDeleteHello girls! Glad you love this post! :)
ReplyDeletewow this is very helpful for a beginner like me. i love how you do a tutorial very detailed and plus may tips pa :) im happy that i found your blog Ms. Martha :)
ReplyDeleteThis is really a helpful tip. I've always had problems with falsies and I always have a tendency to repeat the whole process of putting it on, and when watching those videos, I always have a hard time doing what they've done, so this step-by-step guide will seriously be helpful to me. Thanks!
ReplyDeleteP.S. I'm a newly to your blog and I'm already loving it. Keep up the good work! :D
Thank for this detailed post! I finally know why something went wrong when I tried putting falsies before because I just watched vids online but your tips are really good. I think the eyeliner also helps that the glue adheres to it not to the skin directly.
ReplyDeletethanks for this ate martha!
ReplyDeleteLet me know what you think of this post! :)