
A great Friday to everyone! Our Fan Mail Friday question is from Cha. She asks:
Hi Ms. Martha!
Avid reader here! I was really moved to start a beauty blog by you and the other beauty blogs I read. I love makeup too! I'm planning to start my blog early next year because right now, I'm all about studying on how to put up and run a blog. Just want to ask, how do you take great mugshots? I like the photos in your product reviews because they're very good--it's almost as if I'm holding the products in my hand! Any tips? Looking forward to your reply. I'll be one happy girl if you answer my question!
Love,
Cha

One of my best product mugshots to date: It's very clear, color is true-to-life, and the product is highlighted.
Hi Cha!
Great question! And good luck on your blog! Don't forget to send me a link so I can visit it. Thank you for the nice compliments too! :)
Regarding your question, I was contented with mediocre (and sometimes crappy) pictures before then I have realized that they don't look nice-as simple as that. So I read a couple of photography magazines, researched about photography tips over the Internet, and asked for expert advice from my photographer friends and friends who are not photographers, but are quite skilled with photography. So here's a list of what I think every beginner should know. Some of you might have read some of these tips somewhere, but this is just for the benefit of those who are yet to learn. I also threw in some of my personal tricks here. It would also be great if you can avail yourself of photography classes but if you don't have the budget yet, then click READ MORE and start learning.

INVEST IN A GOOD CAMERA
Your pictures are only as good as your camera. I don't want to sound snobbish but 'tis true: Good cameras produce good photos. A camera is a blogger's best friend, so find one that does not only produce good photos, but fits your personality and taste as well. Do you want a DSLR or a digital camera? What pixel power do you want? Do you want something big or small? Do you want one or two cameras? Make a list of your top 5 camera choices. It would also help if you'll read up articles online on the cameras you're eyeing so you'll have a glimpse of how they perform, and for comparison's sake. This will make choosing much easier. Out of my five choices, I settled for Lumix LX3 because it was tagged as one of the best digital cameras in 2007, (?) and it produces DSLR-quality pictures but without the bulk of a DSLR camera. (But I'm thinking of changing it to Lumix LX7 onces it comes out. :D)

LEARN HOW TO USE YOUR CAMERA
In relation to the first advice, your camera is only as good as your skills. Even if it's high- tech and all that, it won't produce photos on its own so you have to be the smarter one between the camera and you. Familiarize yourself with your camera's settings to maximize it. Read its manuals thoroughly, and experiment with photos using different camera settings until you find a setting that you prefer.

INVEST IN OTHER PHOTOGRAPHY PARAPHERNALIA
When I've decided to make my product mugshots look more professional, I invested in lamps and a photo dome. These paraphernalia allow me to take pics even during night time, the only time I have to take product mugshots. Invest in photo boxes, tripods, reflectors, lamps, and whatnots to create swell pictures, but make sure you buy only what you need and know how to use.

IMPROVISE!
Photo domes and boxes can be quite costly so here's a cheaper alternative:
What you'll need: Lamps (At least three. They're the most important so save up for them!); Two sheets of bond paper or white cloth
1. Set up the lamps on a table or any elevated surface: Two on the sides and one in front. Please refer to the picture on top.
2. Get two sheets of clean bond paper. Tape the first sheet on the wall, and place the other sheet on the surface. If you have a white cloth, mount the other end on a wall and let the rest of the cloth hang loosely on the surface. Even out any kink and fold.
3. Take test shots. Should you find the pictures too white or glaring, move the heads of the lamps away from the product to diffuse the lights, or remove one lamp. Continue experimenting until you get a decent picture.
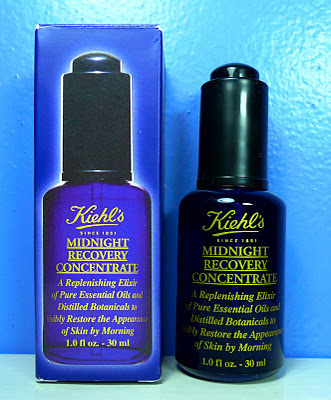
Photo taken using my improvised "photo box". I didn't use bond papers or a white cloth in here.
Additional tip: You can also take pics sans the bond papers and white cloth. Look for a plain- colored wall and use it as a background for your photos.
PRODUCT MUGSHOTS DON'Ts
When taking product mugshots, make sure they're as close as they can get to the products in real life. Check out these product photos that you should start deleting in your camera:

Too dark photos

Blurry photos

How about semi- blurry ones? NA-AH! DELETE!

Overexposed photos

De-focused photos
PRODUCT MUGSHOTS DOs
Here are some of the angles that you must take pictures of:

Profile of the product: Make sure it's clear, clear, clear!

Product Aspects: Take photos of some of the important features of the product like the extra compartments, contents, width, size, and packaging. This allows your readers to 'feel' the product and trust me, they will appreciate the effort. :)

Ingredients: Some people are wary of whatever is in a product so include a clear and readable photo of the ingredients list, if there's any. If there's none, make an effort to research about that particular product's ingredients and include it in your post.

Swatches: Take photos of swatches, especially makeups so your audience would have an idea of how the colors look like. Remember to take photos under natural lighting to give your readers an idea of how the product will most likely look like.
PRODUCT MUGSHOTS TIPS:
Here are some of my tips on how to achieve more fab product photos:

GET RID OF THAT GLARE
See that white glare covering the name of the brand? Ugh! That's not nice because it has blurred out one of the most important features of the product, the brand name! You'll encounter this problem with glossy, plastic tubes because they are highly reflective so here's a way to solve this:

That glare is coming from the frontal lighting so lift the lamp to diffuse the light. That's it! :D

MR. SUN IS YOUR BESTFRIEND!
When the sun is shining, take advantage of it because nothing beats the beauty of natural lighting in photos. But don't take pictures directly under it because you might produce overexposed photos, and you might get a heat stroke!

Photo taken under natural lighting
Find a well- lit place in your house and take pictures there.

Additional tip: You can also play with lighting effects. One time, the sun was shining brightly in the sky and rays of golden light have filtered through my window. It was very lovely so I decided to make use of it. The result is this lovely, ambient photo of Benefit's They're Real Mascara. That's also another thing: Develop an eye for design and be sensitive of the various elements in your surroundings that could help you create beautiful pictures.

ON TAKING GROUP PHOTOS
Group photos can be quite a challenge because you have to figure out how the products will fit in front of your lens, and how you can arrange them creatively without compromising anything! What I do is I just put them all in one line, and I open up some of the products to showcase what's inside of them--this helps break the monotony in the picture. The smaller ones like eye pencils and concealers, I put them right in front of the bigger ones to highlight them.

If you have various products from a single line, be playful and arrange the products in a whimsical way like this.
BE CREATIVE!
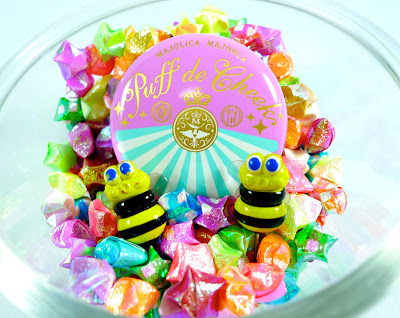
Play with themes based on what you think is the overall mood and feel of a particular product. For example, Majolica Majorca's Puff De Cheek: It's very cute, playful, and girly so I decided to put it in a candy bowl, filled it with paper stars, and added these two bumble bee pins to boot! Creativity is the spice of photos so don't be afraid to experiment!
I hope you all enjoyed this post! :) Don't forget to show me your pictures! :D
**Got a burning question about makeups, skin care products, beauty, dieting, and health tips, relationships, and whatever? Just send them to martha.stabarbara@yahoo.com or shoot 'em up at The Beauty Junkee's FB Fan Page via the MESSAGE button and I'll get back to you as soon as possible. (Please, do not send me Math- related queries. :D)


20 Comments
Thank you for the tips. Taking product mugshots is always a challenge for me. I'm glad you find time to share such valuable information to us, your readers.
ReplyDeleteKeep it up, Miss Martha! ;)
OMG we have the same pink lamp haha! My only problem about using a lamp is that the product reflects the light, so I have yet to muster "lamp-lifting" and finding the right angle. But anyhow, this made me GUILTY! I was the type who gets satisfied with my low quality photos just so I have something to post for the day. "Was" because I'm really trying my best now. A blog is a person's representation to the world. This made me think twice first before hitting publish button!
ReplyDeleteWow this is really helpful! Thank you so much for this post. I'm planning to make my own light box now :)
ReplyDeleteThank you so much for this post, Miss Martha! These are very helpful tips!
ReplyDeleteIt means a lot to me to get good product/swatch photos for my blog. Unfortunately, my place doesn't get a good amount of natural lighting, and I always have to take photos under fluorescent light. Ugh...
Now I'm really considering getting a better camera and improvise on a lightbox.
Great post! Very useful to bloggers. While I don't agree with your first point (you can take good photos with a cellphone), I strongly agree with the second. Skill trumps equipment anytime. I admire your improvisational spirit as well. Instead of using bond paper, I use a homemade light box. I love how cheap and fun it is to make your own gear. :p
ReplyDeleteOMG!! This is really helpful! It takes me a lot of time and effort to take pictures for my blog too. I want to take good quality pictures but I don't have enough funds yet to invest for photography paraphernalia. I usually use clean bond paper as my background. Since I only use digital camera (I use Sony cybershot T900) it took me a lot of shots to get the perfect one. I think I need those lamp shades too! Thanks for this super useful tips, Martha!:)
ReplyDeleteP.S Maybe you can visit my blog too. I'm just new when it comes to blogging!:) Hope to see you at the Snoe Beauty Event tomorrow! I'm a fan!:)
xoxo,
Mitchie
http://mitchiekyuti.blogspot
Thanks for the tip, this is really helpful :)
ReplyDeleteComprehensive tutorial!
ReplyDeletexoxo
MrsMartinez
Thank u thank u for this post Martha! I'll try to apply all of those tips on my next mugshot :)
ReplyDeleteThanks for this post, Martha. I need to invest on some minor photography equipment for better product shots. :)
ReplyDeleteSuper enjoyed it and learned a lot! I am super convinced that I need to get a decent camera, than just rely on my smart phone's camera... =D
ReplyDeleteThanks, Ms. Martha! ^__^
Thank you for this Ms Martha!! I've learned a lot from this :) lots of love :*
ReplyDeleteVery informative post! I made a DIY light box 2 yrs ago because couldn't afford a real one yet. Still using it. Hihi. Your shots are so nice! They do look like they're DSLR shots :D
ReplyDeleteall I use is a 2pc medium sized illustration board which I glued together so that I can fold them, then I placed white cardboard for a clean white background. Then I use 2 lamp shades for lighting ^_^
ReplyDeleteHi Martha!
ReplyDeleteWhere'd you get your photo dome?
i love the tips! i super agree with MR. Sun being beauty blogger's bestfriend! haha. :)
ReplyDeletewhere did you get the white thing? :)
ReplyDeleteHi girls! Glad you like this post!
ReplyDeleteJill and Jenny: I got it from a store that sells photography paraphernalia in Rockwell. Forgot the store though. Will ask my brother. :)
This post can really help me because I'm trying to focus on taking better photos for my blog but didn't know what was right/wrong, etc.
ReplyDeleteThank you for the post :D
Tofu x
I also made my own lightbox. I blogged about it here: http://www.beautycolada.com/2012/12/create-great-product-shots-diy-lightbox.html
ReplyDelete~Jaja of Beauty Colada
Join my Christmas giveaway HERE
Let me know what you think of this post! :)